The trade bar sits under the chart. When you have no position it shows the last traded price, a hint, and two buttons: BUY and SELL.
The quick way (the default)
In free practice, the Daily Challenge and the first lesson, pressing BUY or SELL puts you straight into the trade at a sensible default size. There is no form. The point of those sessions is the decision — should I be in this at all, and where do I get out? — so the Lab removes everything else.

- Press BUY to go long, or SELL to go short.
- You are in. The trade bar becomes the position bar.
- Now set your stop — see setting a stop-loss and a target.
The full order ticket
From the position-sizing lesson onwards, BUY and SELL open the order ticket over the chart instead, because sizing is the thing being taught. The ticket has:
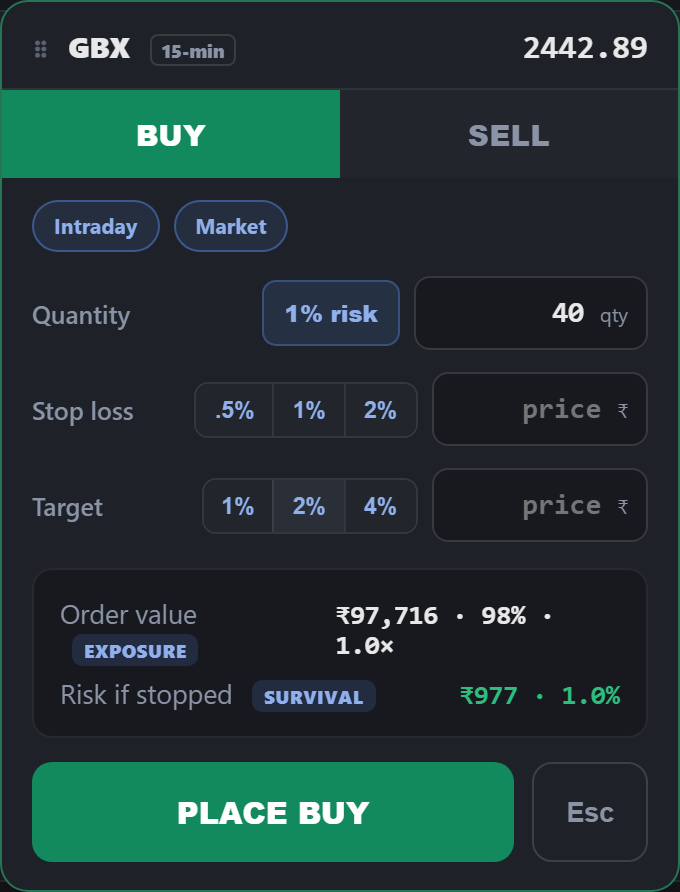
- BUY / SELL at the top — switch side without closing the ticket.
- Quantity — how many units. In the risk modules a 1% risk button auto-fills a quantity that risks about 1% of your capital.
- Stop loss — presets at 0.5%, 1% and 2% from entry, or type a price.
- Target — presets at 1%, 2% and 4%, or type a price.
- Order value (EXPOSURE) — how much capital the position commands.
- Risk if stopped (SURVIVAL) — what you lose if the stop hits.
- PLACE to send it, or Esc to cancel.
The PLACE button stays disabled until the quantity is valid. Enter inside the ticket places the order.
Watch both summary numbers. Exposure and risk move
independently. A tight stop lets you hold big exposure at small risk; a wide stop risks a
lot on a small position. Sizing is done on the risk line.
Keyboard
- B — buy · S — sell
- X — exit the position · C — trim half · T — toggle trailing stop
- Esc — cancel the ticket (or leave fullscreen)
You start every session with ₹1,00,000 of simulated capital.
Reminder. The Trading Lab is an educational simulation running on synthetic data with play capital. Nothing here is investment advice, no buy or sell call is given on any real security, and no claim is made about returns.